

Uploading To S3 With AngularJS And Pre-Signed URLs
Share
This is a revised post based on the popular original article found at Uploading To S3 With AngularJS
The content is similar other than a few key steps which have been removed/altered but for the sake of clean reading, I thought I would create a new post for it.
Scenario
The scenario we’re going to build for here will be to upload a file (of any size) directly to AWS S3 into a temporary bucket that we will access using Pre-Signed URLS
The purpose of this front end application will be to get files into AWS S3, using JavaScript and some basic backend code.
A good example is having a user upload a file from a web form for which your application server will then pull back down, encrypt or resize before pushing it back into a more permanent bucket for storage.
By uploading directly to S3 we will be taking load off our application server by not keeping long running connections open while slow clients upload large files. A problem which is especially visible when using services like Heroku.
Step 1: Add the file directive
The file directive simply takes the attributes from a file input type and binds it to the $scope.file object so you can easily work with the filename, file size etc from your controllers.
As soon as you select a file, you can access $scope.file.name or $scope.file.size to get the filename and size for handling client side validation and unique S3 object names.
This means you can validate the file size from the browser with something simple like;
if($scope.file.size > 10585760) {
  alert('Sorry, file size must be under 10MB');
  return false;
}
Go ahead and include the following directive in your project;
directives.directive('file', function() {
  return {
    restrict: 'AE',
    scope: {
      file: '@'
    },
    link: function(scope, el, attrs){
      el.bind('change', function(event){
        var files = event.target.files;
        var file = files[0];
        scope.file = file;
        scope.$parent.file = file;
        scope.$apply();
      });
    }
  };
});
In your HTML you will include the file element as follows
<input name="file" type="file" file />
Step 2: Configure CORS And Expiry On The Bucket
CORS or “Cross Origin Resource Sharing” allows us to restrict the operations that can be performed on a bucket to a specific domain, like your websites domain. Typically a CORS Ajax request will first initiate an OPTIONS HTTP request to the server which will return the allowed options for that endpoint before the real Ajax request actually happens. Think of it like an access request, the server will inspect where the request originated from and return a set of allowed options (or none) for that origin.
Don’t worry, you won’t have to make that request your self, Angular will handle all of that for you, but it’s good to have a basic understanding of whats happening during the lifetime of the request.
Add The CORS Policy
From Your AWS console, under S3 click into your bucket then click the Properties button. There you will see a “Add CORS Configuration” button. It’s here that you’ll configure your bucket to only allow PUT requests from particular origins.

You can use the following sample config – just edit to reflect your development, production and staging environments.
<?xml version="1.0" encoding="UTF-8"?>
<CORSConfiguration xmlns="http://s3.amazonaws.com/doc/2006-03-01/">
    <CORSRule>
        <AllowedOrigin>http://localhost:3000</AllowedOrigin>
        <AllowedOrigin>https://www.yourdomain.com</AllowedOrigin>
        <AllowedOrigin>http://staging.yourdomain.com</AllowedOrigin>
        <AllowedMethod>PUT</AllowedMethod>
        <MaxAgeSeconds>3000</MaxAgeSeconds>
        <ExposeHeader>x-amz-server-side-encryption</ExposeHeader>
        <ExposeHeader>x-amz-request-id</ExposeHeader>
        <ExposeHeader>x-amz-id-2</ExposeHeader>
        <AllowedHeader>*</AllowedHeader>
    </CORSRule>
</CORSConfiguration>
It’s a good idea to split these into other buckets, but for simplicity we’ll just use the one bucket.
Configure Object Expiry
It’s a good idea to expire the objects in this bucket after some short period to prevent people from just uploading huge objects to screw with you. Your server side code should handle moving and deleting valid files so you can assume those that are left after 24 hours are not meant to be there.
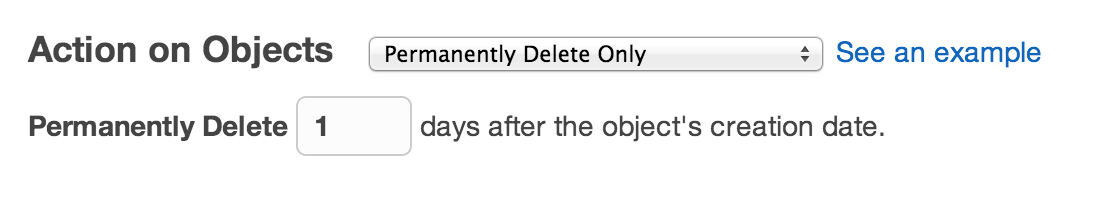
From your S3 console, view a bucket and then click Properties, expand the “Lifecycle Rules” section and follow the prompts. Set the action to “Permanently Delete Only” and set it for 1 day which will delete any objects in the bucket that are older than 1 day permanently.
Now you’re ready to lay down some code.
Step 3: Generate The Pre-Signed URL And Upload
This is a two step process and assumes you have already configured the AWS SDK credentials on what ever backend framework your using.
First we create a simple function on the server side that generates the URL based on the filename and file type, then we pass that back to the front end for it to push the object to S3 using the Pre-Signed URL as a destination.
Generate The URL
On the server side you will need to be using the AWS SDK. We’ll use Ruby for this example. Create a controller action to generate and return the presigned URL as follows
  def presigned
    if params[:filename] && params[:type]
      s3 = AWS::S3.new
      obj = s3.buckets[YOUR_TEMP_BUCKET].objects[params[:filename]]
      url = obj.url_for(:write, :content_type => params[:type], :expires => 10*60)  # Expires 10 Minutes
      render :json => {:url => url.to_s}
    else
      render :json => {:error => 'Invalid Params'}
    end
  end
The PreSigned URL is dynamic and includes details about the object name, bucket, signature and expiration details. Its important to note that the file name and the content type are included as part of the signature so you need to include them in the front end request to S3 exactly as you did to generate the URL otherwise you’ll get an invalid signature response.
Now in your Angular controller, create the upload function
$scope.upload = function(file) {
  // Get The PreSigned URL
  $http.post('/presigned'),{ filename: file.name, type: file.type })
    .success(function(resp) {
      // Perform The Push To S3
      $http.put(resp.url, file, {headers: {'Content-Type': file.type}})
        .success(function(resp) {
          //Finally, We're done
          alert('Upload Done!')
        })
        .error(function(resp) {
          alert("An Error Occurred Attaching Your File");
        });
    })
    .error(function(resp) {
      alert("An Error Occurred Attaching Your File");
    });
}
The $scope.upload method here could be broken out into a service or factory to clean things up a little, but you could also just drop this method into your controller and with a few minor tweaks be up and running.
Step 4: Processing The Upload
This step is really going to depend on what you want to do with the file and is going to vary depending on your application server but, generally speaking, now all you need is the path to the file in S3 (which is basically just the bucket name plus the object name) and you can pull the file down, process it and push it back to another location from the server in some sort of background process that doesn’t tie up the front end.
As an example, in Ruby On Rails, using the AWS SDK for Ruby you could pull the file down, transform it and push it back up to another bucket with something like this
# Get The Temporary Upload
s3 = AWS::S3.new
temp_obj = s3.buckets['YOUR_TEMP_BUCKET'].objects[params[:uploaded_file]]

begin
  # Read File Size From S3 For Server Size Validation
  size = temp_obj.content_length

  # Assign A Local Temp File
  local_file = "#{Rails.root}/tmp/#{params[:uploaded_file]}"

  # Read In File From S3 To Local Path
  File.open(local_file, 'wb') do |file|
  	temp_obj.read do |chunk|
  		file.write(chunk)
  	end
  end

  #########################################
  # Perform Some Local Transformation Here
  #########################################

  # Now Write Back The Transformed File
  perm_obj = s3.buckets['YOUR_PERMANENT_BUCKET'].objects[params[:uploaded_file]]
  perm_obj.write(File.open(local_file))

  rescue StandardError => exception
    # That's A Fail
  ensure
    # Delete The Original File
    temp_obj.delete
  end
end
Summary
We’ve seen now how we can upload files directly to AWS S3 using JavaScript. It may seem like a lot of work from the first few steps in this article, but they are necessary in order to prevent people abusing your S3 bucket and your app.
I’v been using this technique for a while now and it’s been pretty solid. It certainly solved my issue with Heroku H12 timeouts which was causing me endless headaches.
Have any suggestions how to improve on this technique? Let me know in the comments section below